Account Handler Guidelines
Confidentiality Notice: As a regular Bank Account Handler, your view is restricted. You will only see the bank accounts that have been explicitly assigned to you by the CFO.
-
1Access the Bank TrackerLog into the system with your email and password. Click the Bank Tracker menu link in the sidebar ( icon). You will automatically load into the My Bank Updates tab.
-
2Identify Pending AccountsYou will see a list of dedicated cards, representing each bank account you manage. Review the top right badge on each card:
• Pending Update indicates values must be filled for today.
• Posted means today's values are already locked and saved. -
3Input Daily Values & Real-Time MathFill in the three numeric fields. Notice the Net Usable Balance changes automatically as you enter values:
Calculation Formula:
$$\text{Net Usable Balance} = \text{Bank Balance} + \text{In-Transit Deposits} - \text{Scheduled Payments}$$Qatar National Bank (QNB)Pending UpdateNet Usable Balance 135,000.00 QAR -
4Add Comments & SubmitInput optional comments if you have payment details or deposit delay reasons, then click Post Update. The card badge will switch to green (Posted).
-
5Account Access Delegation during LeaveIf you are planning to go on a leave, you can temporarily delegate your bank account access to update balance to another active staff member. During this period, all your system notifications and reminders will be automatically redirected to the delegated staff.
To set up delegation:
1. Go to My Profile in the sidebar. 2. Scroll down to the Account Access Delegation card. 3. Select the employee you want to delegate to from the dropdown. 4. Set the Start Date and End Date for your leave period. 5. Click Save Delegation Settings.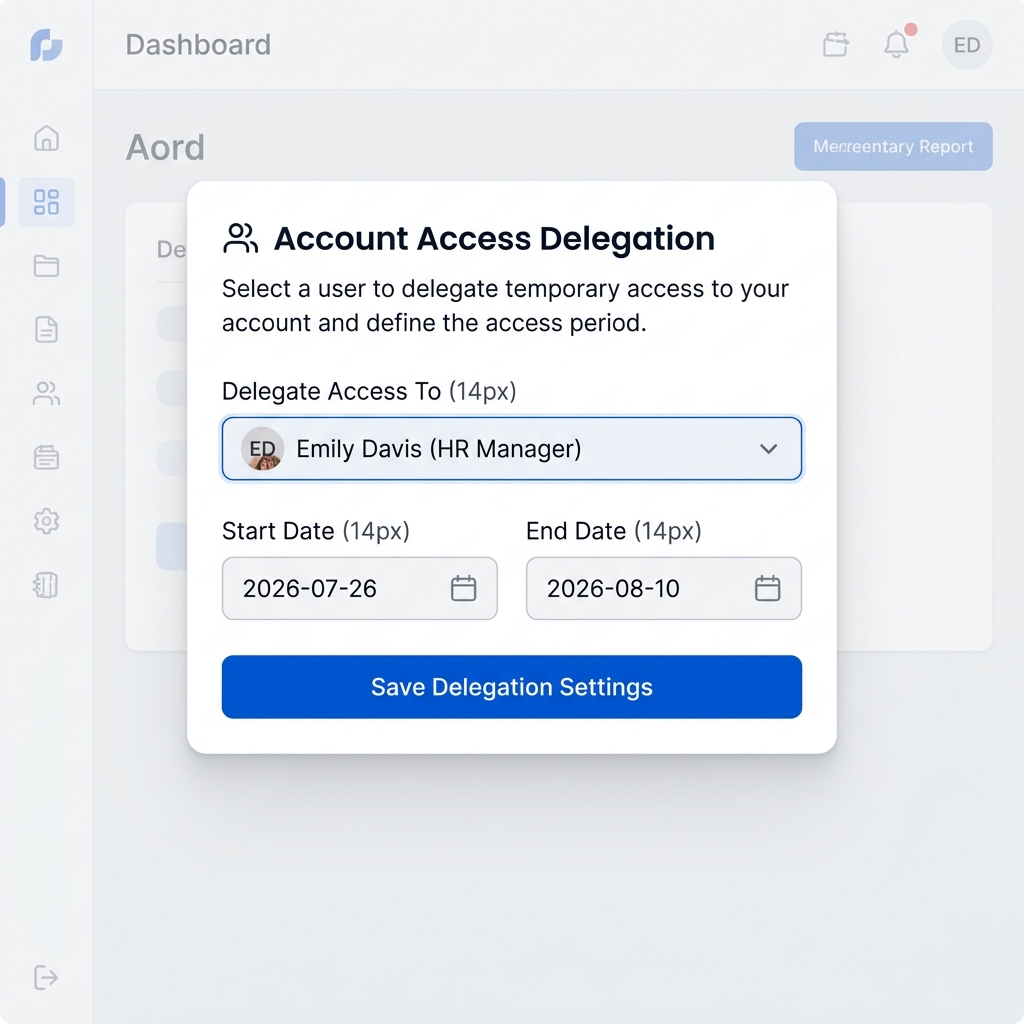 Self-Service delegation card in the My Profile tab for active leave coverage.
CFO & Administrator Guidelines
Administrative Control: Only users flagged with privileged roles (CFO, Admin) can configure settings, trigger reminders, resend login details, or view consolidated Daily Reports.
-
1Generate consolidated CFO Daily Position ReportsNavigate to the CFO Daily Report tab inside the Bank Tracker. Use the Grouping dropdown to organize accounts by Corporate Entity or Industry. Aggregated values and net figures update automatically.
 CFO consolidated daily report dashboard showcasing entity/industry group subtotals.
 -
2Batch Import Bank AccountsTo upload multiple accounts, select the Import Excel tab. Download the sample Excel structure, fill in your fields, and upload it. The importer normalizes columns and auto-provisions handlers automatically.
 Spreadsheet Importer layout showing template download button and normalization engine.
 -
3Reset User Credentials / Resend DetailsIf a handler forgets their login, go to User Management in the sidebar. Locate their row in the User Directory and click the Resend Details mail button. The system resets their password and sends a notification.
 User Directories table displaying the "Resend Details" mail-icon button in the Actions column.
 -
4Configure Global Reminders & CutoffsUnder the Settings tab, configure global parameters including the Daily Cutoff Hour, automated reminder trigger schedules, and report formats.
-
5Manage Employee Delegation and OverridesAdministrators and CFOs can set, clear, or modify delegation settings on behalf of any employee.
To configure delegation:
1. Navigate to User Management in the sidebar. 2. Find the employee in the directory table and click Edit. 3. Scroll to the Delegated User (For Leave) fields. 4. Select the covering employee and input the Delegation Start and Delegation End dates. 5. Click Save Changes to apply the delegation settings.
Staff Job Analysis Guidelines
Purpose of Job Analysis: This profile allows you to register all your operational duties and responsibilities. The AI assistant cross-checks these duties for load balancing, workload optimization, and duplication avoidance.
-
1Access the Job Analysis DashboardLog in to the system. From the sidebar menu, click on the Job Analysis link ( icon) located right before 'My Profile'. This opens your personal Job Analysis dashboard.
-
2Understand and Fill the Job Duty FieldsClick on the + Add Duty button to open the form. You must register each regular operational duty with the following fields:
Field Name Definition & Guidelines Duty Title Provide a concise name for the task (e.g., "Prepare VAT Return" or "Post petty cash entries"). Avoid overly generic names. Frequency Select how often you perform this:
• Daily: Performed every working day (e.g. daily cash counts).
• Weekly: Performed once a week.
• Monthly: Performed once a month (e.g. ledger reconciliations).
• Annually: Performed once a year (e.g., year-end tax returns).Hours per Occurrence The average time in hours spent on the duty each time it is performed (e.g., enter 2.5 for 2 hours and 30 minutes). Description (Optional) Describe the steps, software platforms, templates, or reports used. Highly recommended for accurate AI overlap and workload audits. -
3Submit & Lock for CFO ReviewOnce all your core operational duties are registered, click the green Submit Job Duties button. This will submit your profile for consolidated CFO audit. Submitting locks your profile from edits (to unlock, contact the CFO).
CFO Job Analysis Management Guidelines
Consolidated Overlap Analysis: CFO and Admin users can monitor submission rates, run cross-organizational duplication audits, and receive AI load balancing suggestions.
-
1Monitor Staff Submission StatusesNavigate to Job Analysis in the sidebar. As a CFO, you will see a consolidated dashboard of all active employees. The dashboard lists each staff member's department, submission status (Submitted vs. Pending), registered duty count, and total monthly workload.
-
2Send Reminders or Reopen Profiles• For staff members with a Pending Submission status, click the Remind button in their row to send them an immediate custom email and in-app reminder. Or click Remind All Pending at the top to nudge all pending staff at once.
• If a staff member has already submitted their duties but needs to edit them, click the Reopen button to unlock their form. -
3Execute AI Workload & Duplication AuditClick Run AI Workload Analyzer at the top right. The AI engine parses all submitted duties to build a Monthly Workload Comparison bar-chart, detect Overlapping/Duplicate Duties using linguistic similarity, and generate Load Balancing Recommendations.
Corporate Shared Services - Allocation Overview (SOP AEE-008-SS-2026)
Standard Procedure Reference: AEE-008-SS-2026
The Corporate Shared Services Cost Allocation Model distributes corporate functional overheads across operating subsidiaries based on verified monthly operational drivers. All allocations culminate in certified PDF Debit Notes settled via Cash Settlement in favor of Al Emadi Enterprises.
The Corporate Shared Services Cost Allocation Model distributes corporate functional overheads across operating subsidiaries based on verified monthly operational drivers. All allocations culminate in certified PDF Debit Notes settled via Cash Settlement in favor of Al Emadi Enterprises.
Currently Applied Drivers Table
HR Role Guide: Headcount Driver Entry
Driver Definition: Total active staff headcount across all participating corporate entities.
-
1Access 2. Monthly Inputs TabLog into MyTask Portal → Select Shared Services → Click tab 2. Monthly Inputs.
-
2Input Headcount per Subsidiary EntitySelect Human Resources from the function dropdown. Enter verified employee headcount numbers directly into each subsidiary's input cell.
-
3Save & Submit Function ValuesClick "Save & Submit Function Values" to timestamp your entry and conclude automated reminders.
IT Role Guide: Headcount excl. labor
Driver Definition: Office and administrative user licenses/devices supported (excluding manual labor).
-
1Enter Admin User CountsIn Shared Services → 2. Monthly Inputs, select Information Technology. Enter supported admin/office user counts per subsidiary entity.
-
2Save & Submit Function ValuesClick "Save & Submit Function Values" to finalize.
Procurement Role Guide: Purchase Orders Value
Driver Definition: Total approved ERP Purchase Orders value processed in QAR for each operating entity.
-
1Input Monthly PO Values in QARIn 2. Monthly Inputs, select Procurement. Enter the total purchase order values in QAR.
-
2Save & Submit Function ValuesClick "Save & Submit Function Values" to conclude data entry.
Finance Role Guide: Sales / Revenue
Driver Definition: Gross operating sales and revenue in QAR recorded for each subsidiary.
-
1Input Monthly Revenue in QARIn 2. Monthly Inputs, select Finance. Enter revenue figures in QAR for each subsidiary.
-
2Save & Submit Function ValuesClick "Save & Submit Function Values".
Legal Role Guide: Efforts Base
Driver Definition: Legal advisory, contract reviews, and litigation effort points dedicated per subsidiary.
-
1Input Effort PointsIn 2. Monthly Inputs, select Legal. Enter verified legal effort points.
-
2Save & Submit Function ValuesClick "Save & Submit Function Values".
Logistics Role Guide: Shipments Booked
Driver Definition: Monthly cargo shipments and delivery orders booked per subsidiary.
-
1Input Shipments CountIn 2. Monthly Inputs, select Logistics. Enter shipment quantities.
-
2Save & Submit Function ValuesClick "Save & Submit Function Values".
Engineering Role Guide: Efforts Base
Driver Definition: Project supervision and site inspection effort points allocated per subsidiary.
-
1Input Engineering Effort PointsIn 2. Monthly Inputs, select Engineering. Enter effort points.
-
2Save & Submit Function ValuesClick "Save & Submit Function Values".
PR & Marketing Role Guide: Efforts Base
Driver Definition: Dedicated media campaign and marketing effort points allocated per entity.
-
1Input Marketing Effort PointsIn 2. Monthly Inputs, select PR. Enter effort points.
-
2Save & Submit Function ValuesClick "Save & Submit Function Values".
Subsidiary Finance Team Guidelines
Settlement Notice: All intercompany charges must be settled via Cash Settlement in favor of Al Emadi Enterprises at the earliest upon CFO posting.
-
1Review Intercompany Debit NotesNavigate to Shared Services → 5. Billing & Reports → Subsidiary Invoices & Debit Notes. Locate your entity's monthly statement.
-
2Download Official PDF & SettleClick "PDF" to download the certified Debit Note. Process cash settlement in favor of Al Emadi Enterprises.
CFO Approval & Governance Guidelines
Executive Authority: Full oversight over consolidated allocations, period locking, and automated PDF batch email dispatch.
-
1Audit Consolidated Allocation MatrixIn Reports → Consolidated Allocation Matrix, verify zero mathematical variance across the 10 functional pools and 8 operating entities.
-
2Lock & Release PeriodIn 4. CFO Release Approvals, click "Lock & Release Billing Period".
-
31-Click Batch Email DispatchIn 5. Billing & Reports, click "Send Debit Notes to Entity Finance" to batch-dispatch official PDF statements.